Agradecimientos a Scott Collier
http://kubernetes.io/docs/user-guide/debugging-pods-and-replication-controllers/
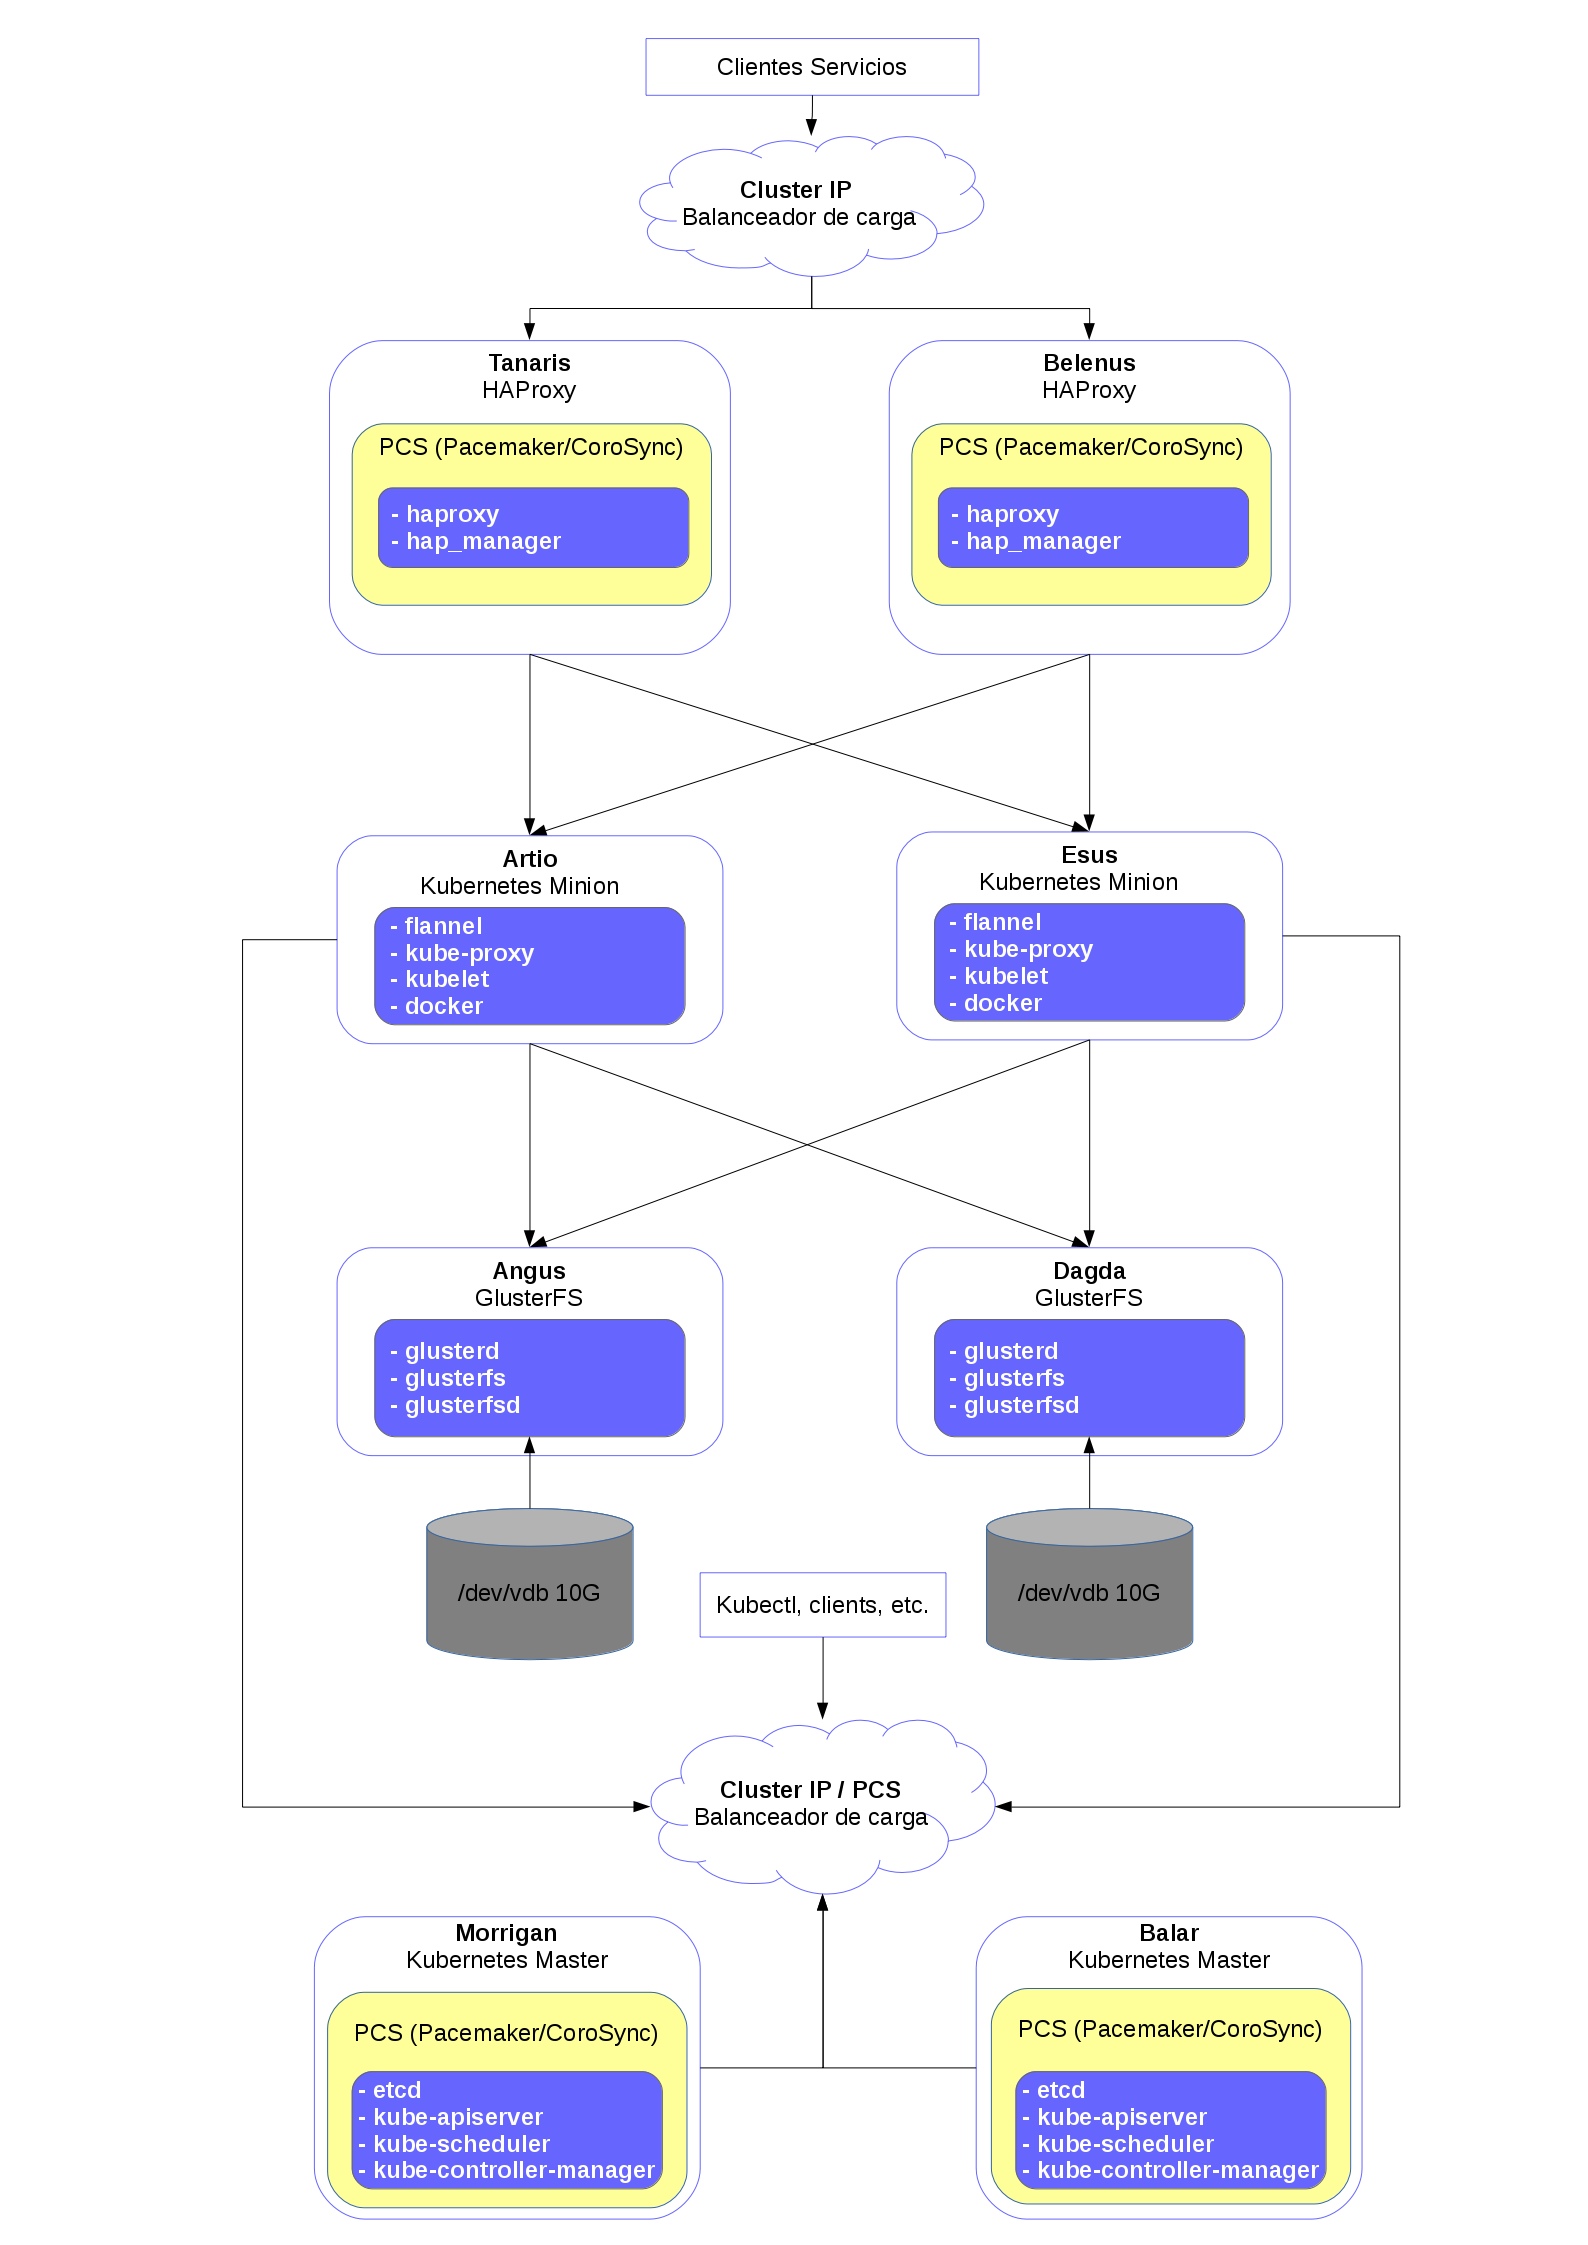
| Nombre | Función | Numero | IP externa | IP interna |
|---|---|---|---|---|
| Taranis | Proxy | 1 | 172.22.205.244 | 10.0.0.48 |
| Belenus | Proxy | 2 | 172.22.205.247 | 10.0.0.53 |
| Morrigan | KMaster | 1 | 172.22.205.240 | 10.0.0.43 |
| Balar | KMaster | 2 | 172.22.205.241 | 10.0.0.44 |
| Artio | KMinion | 1 | 172.22.205.242 | 10.0.0.45 |
| Esus | KMinion | 2 | 172.22.205.243 | 10.0.0.46 |
| Angus | Almacenamiento | 1 | 172.22.205.245 | 10.0.0.52 |
| Dagda | Almacenamiento | 2 | 172.22.205.246 | 10.0.0.50 |
| IP subnet (VIP) | IP Flotante | Servicio |
|---|---|---|
| 10.0.0.38 | 172.22.205.248 | Entrada a HAProxy dinamico |
| 10.0.0.39 | 172.22.205.249 | API Kubernetes masters |
echo "# Celtas Kubernetes
10.0.0.43 morrigan
10.0.0.44 balar
10.0.0.45 artio
10.0.0.46 esus
10.0.0.52 angus
10.0.0.50 dagda
10.0.0.48 tanaris
10.0.0.53 belenus" >> /etc/hostssudo yum install epel-release
echo "[virt7-docker-common-release]
name=virt7-docker-common-release
baseurl=http://cbs.centos.org/repos/virt7-docker-common-release/x86_64/os/
gpgcheck=0" > /etc/yum.repos.d/virt7-docker-common-release.repoInstalación
yum install ntp ntpdate ntp-docConfiguración
chkconfig ntpd on

ntpdate pool.ntp.org
Editamos /etc/ntp.conf
server 0.centos.pool.ntp.org iburst
server 1.centos.pool.ntp.org iburst
server 2.centos.pool.ntp.org iburst
server 3.centos.pool.ntp.org iburst
server 0.rhel.pool.ntp.org
server 1.rhel.pool.ntp.org
server 2.rhel.pool.ntp.org
Reiniciamos ntp
systemctl restart ntpdMasters
yum -y install etcd kubernetes-master pcs fence-agents-allMinions
yum -y install kubernetes-node docker flannelVersión instalada
[root@morrigan]# yum list installed | grep kube
kubernetes-client.x86_64               1.2.0-0.9.alpha1.gitb57e8bd.el7 @extras
kubernetes-master.x86_64 1.2.0-0.9.alpha1.gitb57e8bd.el7 @extrasComponentes que vamos a configurar a continuación:
Cambios en /etc/etcd/etcd.conf
Morrigan
ETCD_NAME=etcd0
ETCD_LISTEN_PEER_URLS="http://0.0.0.0:2380"
ETCD_LISTEN_CLIENT_URLS="http://0.0.0.0:2379,http://0.0.0.0:4001"
ETCD_INITIAL_ADVERTISE_PEER_URLS="http://10.0.0.43:2380"
ETCD_INITIAL_CLUSTER="etcd0=http://10.0.0.43:2380,etcd1=http://10.0.0.44:2380"
ETCD_INITIAL_CLUSTER_STATE="new"
ETCD_INITIAL_CLUSTER_TOKEN="etcd-cluster"
ETCD_ADVERTISE_CLIENT_URLS="http://10.0.0.43:2379"
Balar
ETCD_NAME=etcd1
ETCD_LISTEN_PEER_URLS="http://0.0.0.0:2380"
ETCD_LISTEN_CLIENT_URLS="http://0.0.0.0:2379,http://0.0.0.0:4001"
ETCD_INITIAL_ADVERTISE_PEER_URLS="http://10.0.0.44:2380"
ETCD_INITIAL_CLUSTER="etcd0=http://10.0.0.43:2380,etcd1=http://10.0.0.44:2380"
ETCD_INITIAL_CLUSTER_STATE="new"
ETCD_INITIAL_CLUSTER_TOKEN="etcd-cluster"
ETCD_ADVERTISE_CLIENT_URLS="http://10.0.0.44:2379"
Habilitamos etcd y lo arrancamos (Masters)
systemctl enable etcd; systemctl start etcd; systemctl status etcdPodemos ver el estado del cluster etcd con:
[root@morrigan ~]# etcdctl cluster-health; etcdctl member list
member 3a1e52dab64d52d1 is healthy: got healthy result from http://10.0.0.44:2379
member 615bbac592673ecc is healthy: got healthy result from http://10.0.0.43:2379
cluster is healthy
3a1e52dab64d52d1: name=etcd1 peerURLs=http://10.0.0.44:2380 clientURLs=http://10.0.0.44:2379
615bbac592673ecc: name=etcd0 peerURLs=http://10.0.0.43:2380 clientURLs=http://10.0.0.43:2379Definimos la red flannel para el cluster (Morrigan)
etcdctl mk /atomic.io/network/config '{"Network":"10.80.0.0/16"}'Definimos la red de flannel (Minions) /etc/sysconfig/flanneld
FLANNEL_ETCD="http://10.0.0.43:2379,http://10.0.0.44:2379"Habilitamos y arrancamos Flanneld y Docker (Minions)
systemctl enable flanneld; systemctl restart flanneld; systemctl status flanneld
systemctl enable docker; systemctl restart docker; systemctl status dockerMasters - Editamos /etc/kubernetes/apiserver
KUBE_API_ADDRESS="--address=0.0.0.0"
KUBE_API_PORT="--port=8080"
KUBELET_PORT="--kubelet_port=10250"
KUBE_ETCD_SERVERS="--etcd_servers=http://10.0.0.43:2379,http://10.0.0.44:2379"
KUBE_SERVICE_ADDRESSES="--service-cluster-ip-range=10.254.0.0/16"
KUBE_ADMISSION_CONTROL="--admission_control=NamespaceLifecycle,NamespaceExists,LimitRanger,SecurityContextDeny,ResourceQuota"
KUBE_API_ARGS=""
Minions
Editamos /etc/kubernetes/config
KUBE_MASTER="--master=http://10.0.0.39:8080"
KUBE_ALLOW_PRIV="--allow-privileged=true"
Editamos /etc/kubernetes/kubelet
Artio
KUBELET_ADDRESS="--address=0.0.0.0"
KUBELET_PORT="--port=10250"
# KUBELET_HOSTNAME="--hostname_override=IP_MINION"
#KUBELET_HOSTNAME="--hostname_override=10.0.0.45"
KUBELET_HOSTNAME="--hostname-override=artio"
KUBELET_API_SERVER="--api-servers=http://10.0.0.39:8080"
KUBELET_ARGS="--register-node=true"
Esus
KUBELET_ADDRESS="--address=0.0.0.0"
KUBELET_PORT="--port=10250"
#KUBELET_HOSTNAME="--hostname_override=10.0.0.46"
KUBELET_HOSTNAME="--hostname-override=esus"
KUBELET_API_SERVER="--api-servers=http://10.0.0.39:8080"
KUBELET_ARGS="--register-node=true"Minions
systemctl restart kube-proxy; systemctl enable kube-proxy; systemctl restart kubelet; systemctl enable kubelet; systemctl restart docker; systemctl enable docker; systemctl restart flanneld; systemctl enable flanneldConfiguramos el cluster (Morrigan)
pcs cluster setup --name PCS-HA-Kubernetes morrigan balarIniciamos el cluster y lo habilitamos
pcs cluster start --all
pcs cluster enable --all
Podemos ver el estado actual con
[root@morrigan centos]# pcs status
Cluster name: PCS-HA-Kubernetes
Last updated: Tue Apr 26 09:22:29 1993      Last change: Tue Apr 26 09:22:26 1993 by root via cibadmin on morrigan
Stack: corosync
Current DC: balar (version 1.1.13-10.el7_2.2-44eb2dd) - partition with quorum
2 nodes and 0 resources configured

Online: [ balar morrigan ]

Full list of resources:


PCSD Status:
    morrigan: Online
    balar: Online

Daemon Status:
    corosync: active/enabled
    pacemaker: active/enabled
pcsd: active/enabledAñadimos un recurso cluster con la ip fija reservada a la vip.
pcs resource create ClusterIP ocf:heartbeat:IPaddr2 \
 ip=10.0.0.39 cidr_netmask=24 op monitor interval=30s
Clonamos el recurso para que este en los dos nodos
    pcs resource clone ClusterIP \
     globally-unique=true clone-max=2 clone-node-max=2
Comprobamos el recurso
[root@morrigan centos]# pcs resource show
Clone Set: ClusterIP-clone [ClusterIP] (unique)
 ClusterIP:0    (ocf::heartbeat:IPaddr2):   Started balar
ClusterIP:1 (ocf::heartbeat:IPaddr2): Started morriganCreamos los siguientes recursos para que pcs controle Kubernetes
pcs resource create APIServer syst.html:kube-apiserver master-max=2 --group kubernetes-master
pcs resource create Scheduler syst.html:kube-scheduler master-max=2 --group kubernetes-master
pcs resource create Controller syst.html:kube-controller-manager master-max=2 --group kubernetes-master
Comprobamos el estado
[root@morrigan centos]# pcs resource show
 Resource Group: kubernetes-master
    APIServer   (syst.html:kube-apiserver):   Started balar
    Scheduler   (syst.html:kube-scheduler):   Started balar
    Controller  (syst.html:kube-controller-manager):  Started balar
Podemos clonar los recursos de dos formas diferentes:
Modo 1 por recurso
pcs resource clone ClusterIP \
 globally-unique=true clone-max=2 clone-node-max=2
pcs resource clone APIServer --group master
pcs resource clone Scheduler --group master
pcs resource clone Controller --group master
Modo 2 por grupo
pcs resource clone kubernetes-masterComprobamos los recursos
Modo 1
[root@morrigan centos]# pcs resource show
 Clone Set: ClusterIP-clone [ClusterIP] (unique)
     ClusterIP:0    (ocf::heartbeat:IPaddr2):   Started balar
     ClusterIP:1    (ocf::heartbeat:IPaddr2):   Started morrigan
 Clone Set: APIServer-clone [APIServer]
     Started: [ balar morrigan ]
 Clone Set: Scheduler-clone [Scheduler]
     Started: [ balar morrigan ]
 Clone Set: Controller-clone [Controller]
     Started: [ balar morrigan ]
Modo 2
 Clone Set: ClusterIP-clone [ClusterIP] (unique)
     ClusterIP:0        (ocf::heartbeat:IPaddr2):   Started balar
     ClusterIP:1        (ocf::heartbeat:IPaddr2):   Started morrigan
 Clone Set: kubernetes-master-clone [kubernetes-master]
Started: [ balar morrigan ]Si ejecutamos el siguiente comando el los nodos del cluster, podemos observar que nos responde con los minions de Kubernetes
kubectl get nodesRespuesta
NAME      LABELS                         STATUS    AGE
artio     kubernetes.io/hostname=artio   Ready     18h
esus      kubernetes.io/hostname=esus    Ready     18h
Sin embarco en los minions este comando nos pasara el siguiente error
The connection to the server localhost:8080 was refused - did you specify the right host or port?Para poder acceder desde los minions podemos ejecutar el comando de la siguiente forma
Con la IP del cluster
kubectl -s http://10.0.0.39:8080 get nodes Definiendo el cluster
kubectl config set-cluster test-cluster --server=http://10.0.0.39:8080
kubectl config set-context test-cluster --cluster=test-cluster
kubectl config use-context test-clusterColocación de ClusterIP: Test Failover Cuando uno de los nodos falla y vuelve a levantarse el recurso ClusterIP permanece en en nodo que no se fallo por lo que no esta balanceado. Solo modo 2.
Online: [ balar morrigan ]

Full list of resources:

 Clone Set: ClusterIP-clone [ClusterIP] (unique)
     ClusterIP:0    (ocf::heartbeat:IPaddr2):   Started morrigan
     ClusterIP:1    (ocf::heartbeat:IPaddr2):   Started morrigan
 Clone Set: APIServer-clone [APIServer]
     Started: [ balar morrigan ]
 Clone Set: Scheduler-clone [Scheduler]
     Started: [ balar morrigan ]
 Clone Set: Controller-clone [Controller]
     Started: [ balar morrigan ]
Para que el recurso vuelva a los dos nodos para estar balanceado, desactivamos: stickiness.
pcs resource meta ClusterIP resource-stickiness=0El resultado sera el siguiente
Online: [ balar morrigan ]

Full list of resources:

 Clone Set: ClusterIP-clone [ClusterIP] (unique)
     ClusterIP:0    (ocf::heartbeat:IPaddr2):   Started morrigan
     ClusterIP:1    (ocf::heartbeat:IPaddr2):   Started balar
 Clone Set: APIServer-clone [APIServer]
     Started: [ balar morrigan ]
 Clone Set: Scheduler-clone [Scheduler]
     Started: [ balar morrigan ]
 Clone Set: Controller-clone [Controller]
Started: [ balar morrigan ]ERROR: No API token found for service account default/default, retry after the token is automatically created and added to the service account
Reportado en:
  https://github.com/kubernetes/kubernetes/issues/11355#issuecomment-127378691
  http://stackoverflow.com/questions/31891734/not-able-to-create-pod-in-kubernetes
SOLUCION:
Generamos serviceaccount en Morrigan
openssl genrsa -out /tmp/serviceaccount.key 2048Copiamos la clave privada a Balar
scp /tmp/serviceaccount.key root@balar:/tmp/serviceaccount.keyConfiguración en ambos nodos:
nano /etc/kubernetes/apiserver
KUBE_API_ARGS="--service_account_key_file=/tmp/serviceaccount.key"nano /etc/kubernetes/controller-manager
KUBE_CONTROLLER_MANAGER_ARGS="--service_account_private_key_file=/tmp/serviceaccount.key"En primer lugar ponemos en standby todos los nodos del cluster, los resultados de las pruebas son sobre el modo 1 de clonación ya que da mas información de los recursos. El modo recomendado a usar es el modo 2.
pcs cluster standby --allLos nodos del cluster quedaran de la siguiente forma
Node balar: standby
Node morrigan: standby

Full list of resources:

 Clone Set: ClusterIP-clone [ClusterIP] (unique)
     ClusterIP:0    (ocf::heartbeat:IPaddr2):   Stopped
     ClusterIP:1    (ocf::heartbeat:IPaddr2):   Stopped
 Clone Set: APIServer-clone [APIServer]
     Stopped: [ balar morrigan ]
 Clone Set: Scheduler-clone [Scheduler]
     Stopped: [ balar morrigan ]
 Clone Set: Controller-clone [Controller]
     Stopped: [ balar morrigan ]
En segundo lugar vamos sacando los nodos de stadby para comprobar su correcto funcionamiento. Activamos Morrigan y dejamos en standby Balar.
pcs cluster unstandby morriganLos recursos con Morrigan activo quedaran de la siguiente forma
Node balar: standby
Online: [ morrigan ]

Full list of resources:

 Clone Set: ClusterIP-clone [ClusterIP] (unique)
     ClusterIP:0    (ocf::heartbeat:IPaddr2):   Started morrigan
     ClusterIP:1    (ocf::heartbeat:IPaddr2):   Started morrigan
 Clone Set: APIServer-clone [APIServer]
     Started: [ morrigan ]
     Stopped: [ balar ]
 Clone Set: Scheduler-clone [Scheduler]
     Started: [ morrigan ]
     Stopped: [ balar ]
 Clone Set: Controller-clone [Controller]
     Started: [ morrigan ]
     Stopped: [ balar ]
Paramos Morrigan y activamos Balar
pcs cluster unstandby balar; pcs cluster standby morriganComprobamos su funcionamiento
Node morrigan: standby
Online: [ balar ]

Full list of resources:

 Clone Set: ClusterIP-clone [ClusterIP] (unique)
     ClusterIP:0    (ocf::heartbeat:IPaddr2):   Started balar
     ClusterIP:1    (ocf::heartbeat:IPaddr2):   Started balar
 Clone Set: APIServer-clone [APIServer]
     Started: [ balar ]
     Stopped: [ morrigan ]
 Clone Set: Scheduler-clone [Scheduler]
     Started: [ balar ]
     Stopped: [ morrigan ]
 Clone Set: Controller-clone [Controller]
     Started: [ balar ]
     Stopped: [ morrigan ]
Paramos todos los nodos y los activamos a la vez
pcs cluster standby --all; pcs cluster unstandby --allCon los dos nodos activos el cluster debera quedar de la siguiente forma
Online: [ balar morrigan ]

Full list of resources:

 Clone Set: ClusterIP-clone [ClusterIP] (unique)
     ClusterIP:0        (ocf::heartbeat:IPaddr2):   Started balar
     ClusterIP:1        (ocf::heartbeat:IPaddr2):   Started morrigan
 Clone Set: APIServer-clone [APIServer]
     Started: [ balar morrigan ]
 Clone Set: Scheduler-clone [Scheduler]
     Started: [ balar morrigan ]
 Clone Set: Controller-clone [Controller]
Started: [ balar morrigan ]Para terminar de desplegar configuramos los nodos con HAProxy con hap_manager y GlusterFS.